To avoid confusion, Angular 1 and all its releases are combined in a short name AngularJS, and Angular 2 and all subsequent versions are usually referred to simply as Angular. As a matter of fact, Angular 6 is already released. There’s a great demand for Angular 4 developers as well as for those who use other releases, so, you don’t have to instantly migrate to a newer release just to keep up with the market.

Quick Dive into the History
The history of Angular began in October 2010. The team from Google developed a JavaScript-based framework that later became known to the world as Angular 1. As soon as the framework started to gain popularity as a tool for developing dynamic web pages, its shortcomings, sometimes very critical, also started to reveal. Therefore, Angular 1 was rewritten from scratch, its architecture was changed, TypeScript became the main language, meant to provide all the features of OOP and in 2016 Angular 2 was released.
Pre-Install
The way an Angular application should be built directly depends on what is required to be done. Let’s imagine that we need to get a list of users and display them on the screen. In this tutorial, we want our Angular application not only to solve the task but to remain extensible and universal. We also want our code to be intuitive.
Like with any other Angular application, we would be using the Angular CLI (Command Line Interface) tool to create it. To be able to do this, we need npm which comes with Node.js. Then, let’s install the Angular CLI using npm with the -g (or --global) option. Open terminal and enter this command:
1 | npm install -g @angular/cli |
Now create an empty project using the Angular CLI:
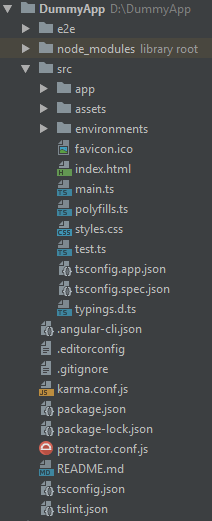
1 | ng new DummyApp |
At this stage, the project looks like this:
Files and Folders Structure
The architecture of Angular is based on modules that combine services, components and other modules. Everything starts with the most important module, which is always named app.module.ts. Note the ts file extension. You’ll want to know TypeScript if you’re going to write Angular apps. This is the main container for other modules, services and components.
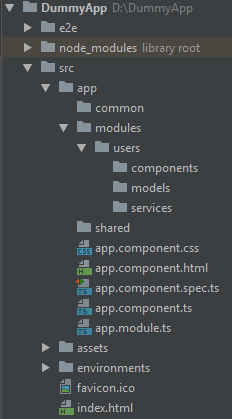
Our future “DummyApp” will consist of several modules. Each module will be responsible for a particular logical entity and contain components, services and models for this entity. We would separately create a directory for the shared module that contains the components required for a number of modules or even all modules at the same time. We need to import it into each module created by us.
Also, we would need to create a common directory, where there will be files of abstract classes. But first things first.
At this stage the project looks like this:
Main App Build Principles
First of all, we need to create a file for the User entity. This will be a regular class with several properties, a method for obtaining a full user name and its factory creating instances of the User class. I initialize all properties with null to be able to create an instance of the User class without filling it with data.
1 | export class User { |
Next, we need to create a service to get a list of users. As it will work with a REST API, we call it RestService. The operations for getting the lists of entities or one entity by its ID are fairly generic. So, I’ll put them in a separate abstract class. To do this, in the common directory, create the services directory where the AbstractRestService will be located in abstract.rest.service.ts:
1 | import {HttpClient} from '@angular/common/http'; |
1 | export class DummyConfig { |
The url parameter will store the string for the API, while the factory function will return a new instance of the class we need. The getList() method will call a standard HTTP request but we will dynamically generate a full URL and create an array of instances of the class we need.
Let’s create a UsersService in the users module that will inherit from AbstractRestService. We will specify the desired url in the constructor and implement factory as a function that will return an instance of the User class.
1 | import {HttpClient} from '@angular/common/http'; |
It’s the perfect time to create a component for displaying the list of users. But, in the future, another entity may appear and, quite possibly, we will need to output one more list. Therefore, first create an abstract list component. In common, let’s create the components/list directory, and put abstract.list.component.ts in it:
1 | import {AbstractRestService} from '../../services/abstract.rest.service'; |
Now, let’s create the concrete implementation of the UsersList component:
1 | import {Component} from '@angular/core'; |
1 | <ul> |
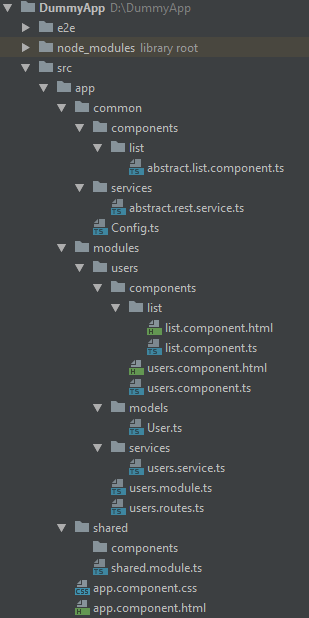
Now the structure looks like this:
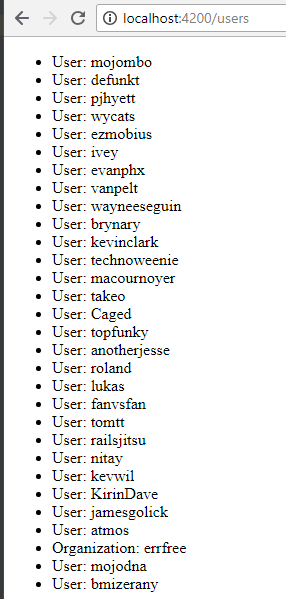
Run the app and the results look like this:
If required, you can create list components for any entities. While file names and entity models will change, encapsulation and behavior will persist. The directory structure may vary slightly but should always remain minimally deep and well-remembered. The general logic is created separately. Thus it can be easily extended or modified. Getting deeper into the TypeScript and learning more about object-oriented programming would let you open even more ways of solving tasks.
And remember, you can always do better!
By Anastasia Stefanuk of Mobilunity
 Sometimes someone asks if they can write for the blog. They may want to just work on their own writing chops, get their foot in the blogging door, or maybe they want to show off something they've done. In any case, they are a guest author and this post happens to be written by one; please enjoy the hard work they've done to put this article together.