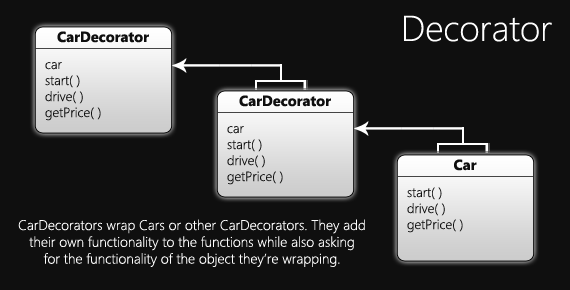
Today I’d like to show another JavaScript Design Pattern: the Decorator, which is a way to add features to objects without subclassing or adding extra attributes. This post continues the JavaScript Design Patterns series that I started several months ago. If you’re new to the JavaScript Design Patterns series that I’m running here, you can find a list of the previous and upcoming posts in the series at the bottom of the post.
Back on Course with Tutorial Posts
After the exciting launch of my new jQuery plugin it’s been difficult to bring myself back to normal blogging and back to this series. If you don’t know what I’m talking about, then you should hop on over to the plugin’s announcement post (when you’re done reading this, of course). However, regardless of how this month started out, I’ve decided to make a commitment to at least 2 “tutorial” posts per month. I put the word “tutorial” in quotes because I’m not sure they can all be generally considered tutorials, but I’m using the word to mean any post whose purpose is to teach, as opposed to announcements or news and the like.
On with the Decorator Pattern
Let’s return to purpose of this post: learning about the decorator pattern. Like I said, this pattern permits us to add features to an object without needing to subclass it. Instead we “decorate” (wrap) it with another object with the same interface that has the one feature we’re adding. To get a better idea of what I’m talking about, let’s first demonstrate how someone lacking knowledge of the decorator pattern would attempt this, especially if they’re coming from a background of classical inheritance.
1 | // Superclass |
As you can see, every combination of features needs to be represented by a new “class”. This might be okay if you have only a couple features, but once you start growing the number of features, this becomes more and more of a nightmare. Of course, if you want to be a jerk, you can do this in an app and leave it for someone else to maintain, but I don’t know how long you’d go before being punched in the face if that programmer needs to add another feature (or 5 more!).
How the Decorator Pattern can Help
Thankfully the Decorator Pattern can make things considerably simpler for us and future maintainers of our code. First we’ll create the base object that will be a Car with no cool features. This also sets up the interface that the decorators will use.
1 | var Car = function() { |
Now we’ll create the decorator “class” that each of the decorator will inherit from. You’ll notice that each of the functions simply pass the call on to the Car that they’re wrapping. In this case the only functions that will be overridden are assemble and getPrice.
1 | // You need to pass in the Car (or CarDecorator) in order to |
Next we create a decorator object for each feature and override the parent’s functions whenever we want to add more or different functionality there.
1 | var PowerLocksDecorator = function(car) { |
Notice that we always call the same function on the wrapped object as well. This is somewhat similar to the way a composite works, though the similarities between the two patterns pretty much end there. In this example, we always call the wrapped object’s function first before adding in the new information from the decorator (if any exists for that function). This creates the desired effect of having the core functions executing first, but other applications might require different order, or possibly might not even call the wrapped object’s function if the intention is to completely change the functionality rather than adding on to it.

Seeing our JavaScript in Action
So how do we use the code that we just spent this entire time making? Well the actual code is below, but maybe I should do a little explaining first. Of course, you’re free to skip this and jump straight to the code if you think you’ve got it down.
First we create a Car object. Then, we create the decorator for the feature we want to add onto it and pass the Car into its constructor. The object returned from the decorator’s constructor is assigned back to the variable that previously held the Car object because since the decorators use the same interface, they too can be considered Cars. We keep adding more features until we’re satisfied and then we have our desired car that we can do whatever we want with.
1 | var car = new Car(); // log "Assemble: build frame, add core parts" |
Concluding this Fiasco
The Decorator proves to be a nice way of maintaining differentiating features for an object and definitely helps improve maintainability over the long haul. You may have noticed, though, that I didn’t include any code to make sure that we didn’t accidentally add the same feature more than once. Don’t worry, the next post will give us a clean answer without having to change any of the code we’ve already written. Adding checks into the decorators to accomplish would prove to be annoying.
If you’ve got something to say about the Decorator Pattern, this post, or even just JavaScript in general, make your voice heard in the comments section below. I’d love to hear it, even if you’re just letting me know I’m an idiot (just try to make it more constructive than “you’re an idiot”). We all have to grow somehow. Also, I’d greatly appreciate if you’d use the social sharing buttons below to spread the word about this post. Little guys like me don’t get big without some help. Happy Coding!
JavaScript Design Patterns series: